
Why?
When you install LaTeX on your system the installation often comes with an editor. For Mac, the one bundled is TexShop, and in Windows TexWorks. For Linux, none is specifically included, as there generally already exist text editors within the Linux distribution, though which one differs from distribution to distribution. Fundamentally, all one needs to use Linux is any text editor: as the website says, no TeX specific editor is necessary.
However, if you are going to write in LaTeX a lot, and you will if you use it as an academic, then taking the time to set up and learn to use a good text editor is a really good investement. In the long run, it will save you time, give you a comfortable environment and make the writing process a lot easier. In this article I’ll look at some of the advantages, and then show how Atom can be set up for using LaTeX. In future articles, I’ll also show how to set up Visual Studio Code, Neovim and Sublime Text.
What to look for in a good text editor
- Customisability.
- Such as the ability to quickly change the look of the editor. Looking at the screen the whole time, you may want to change the look of things a bit, for instance using a different colour scheme depending on whether you are in a dark or light room, or just for shits and giggles.
- Code snippets
- I love using LaTeX to write papers, but I hate writing LaTeX. The markup, though often clear, is very verbose and annoying to type out in full. Writing the boilerplate for itemised lists
\begin{itemize} \item ... \end{itemize}gets really irritating quickly when using them a lot, for instance in beamer. Snippets allow you to insert pieces of code with just a few keystrokes, saving the repitition. The ability to easily use and define your own snippets is an absolute must.
- I love using LaTeX to write papers, but I hate writing LaTeX. The markup, though often clear, is very verbose and annoying to type out in full. Writing the boilerplate for itemised lists
- Ability to integrate bibliography.
- My bibliography file has thousands of entries in, each with a unique citation key. Remembering these can be tough. I save them by author-year (eg.
moskal2018), but for authors who have published multiple articles in one year, then you have to use another key. To avoid having to look them up, some text editors have a search and autocomplete function that is triggered when you type\cite{}, which will then allow you to look up entries by keywords, such as author, year, title of paper etc and it will then insert the correct citation key.
- My bibliography file has thousands of entries in, each with a unique citation key. Remembering these can be tough. I save them by author-year (eg.
- Cross-platform
- Avoids you getting tied into one platform. This is optional, but I don’t like the idea of being tied into one ecosystem. In my time as an academic I started off using Windows, switched quickly to Mac and now for the last few years use Linux. Having the same set up for writing over different systems can help, especially if your home work set up is different to one you use at work.
Atom
Atom is developed by Github, which is in turn owned by Microsoft. It is described as ‘‘A hackable text editor for the 21st Century’’. It has a large, if declining, community of people who develop for it. It is free, and open source. So, you don’t have to pay anything to use it and if you are so inclined, can modify it for yourself or develop your own add ons.
Installation
Installing is easy. Simply go to the homepage and the relevant installation file will be displayed. It can also be installed from various package managers on Linux, as well as Homebrew on Mac and Chocolatey on Windows.
 Getting to the homepage from Linux.
After installation you have a working text editor. Time to set it up for LaTeX.
Note that Atom does not provide LaTeX itself, which needs to be installed on your system as well.
Installing LaTeX support
Atom is built to be customised, and you can install modular packages to aid your workflow in a particular language. For instance, there are many packages specific to editing html, python, markdown etc. etc. These will provide various aids, such as syntax highlighting, language-specific snippets, keyboard shortcuts and more.
Packages can be installed through the settings menu, which can be accessed via edit -> preferences or using the shortcut C+,.
C here refers to the control key, so ctrl on linux/windows and cmd on mac.
You should then read C+, as ‘press ctrl and , together.
Once there, click on the install tab at the side and it brings up a dialogue to search for new packages.1
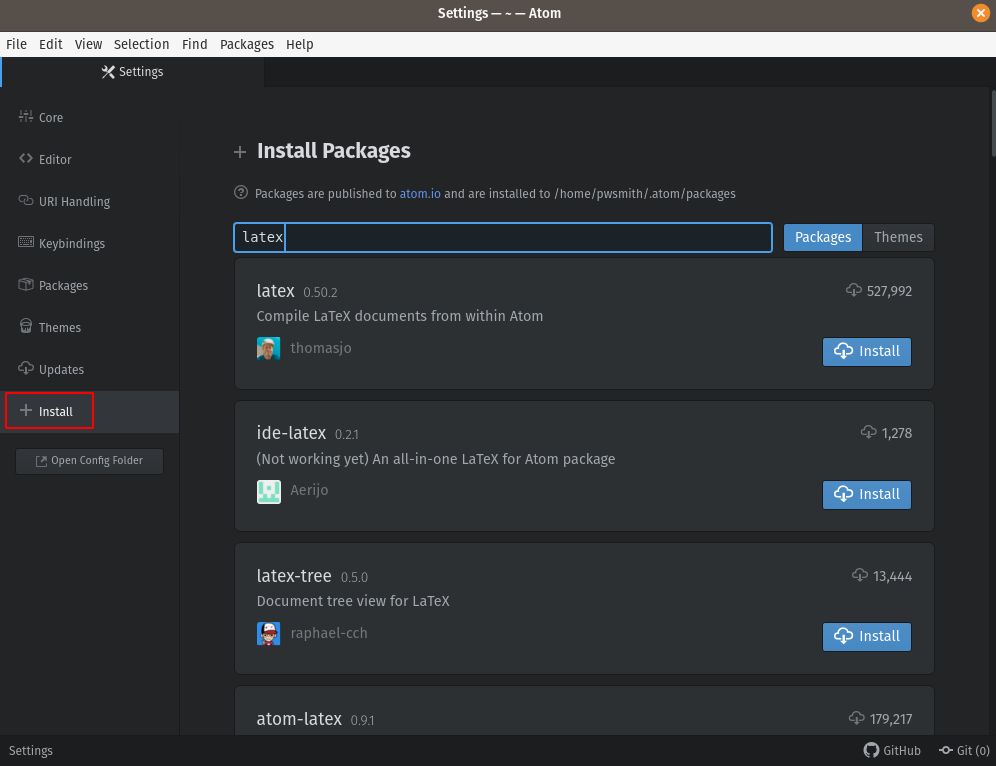 Settings menu with install sub-menu highlighted.
The following are what I like to use for writing LaTeX when using Atom. This is not a complete list of what is available, but the set up I prefer to use within Atom.
language-latex
language-latex is the package that adds language support to Atom. It gives syntax highlighting to make your text easier to read in plain text and defines a number of snippets.
latextools
latextools provides commands related to building and reference integration. It also defines a number of snippets in addition to those provided by language-latex. The manual gives a complete usage description, but here are some of the most useful commands:
C-alt-b: compiles the pdf. By default this calls latexmk or texify, and so the bibiography will be compiled too if necessary.C+l j(the space means release the other keys, soctrl/cmd+ lthenj): jumps to position of cursor in pdf.C-l c-n: wrap in environment. It will insert\begin{} ... \end{}with a cursor between both sets of parentheses, so you can then type in the environment to both begin and end it. If you highlight a block of text before this, the opening and closing tags will be inserted around the text.C-l C-c: same as the above but for a command. If you highlight some text,\{}will be placed around it, and you just have to write the command.C-l C-e: wrap selected text in\emph{}C-l C-b: wrap selected text in\textbf{}C-l C-u: wrap selected text in\textbf{}C-l esc: when you build the document, the console opens at the bottom. This will close it.
These commands, and more, can also be run from the command pallette, which can be opened by pressing C+Shift+p.
One of the nicest aspects of this package is the bibliography integration, which will allow you to search through the specified bibliography file, and fill in the citation key with the result. The window is very clear and customisable in the settings menu.
pdf-view
This one is down to personal choice. I prefer using an external pdf-viewer, such as Okular on Linux or Skim on Mac. I work mostly often on a laptop and so this allows to use the whole screen for an editor and then switch windows to view the pdf in a full screen. However, if you like viewing the output and source side by side, and want them to be part of the same program (i.e. not tile them separate programs left and right), then pdf-view will add a pdf viewer into the atom window.
Character Table
Writing non-Latin symbols and diacritics in Unicode is recommended.
Whilst LaTeX allows for the writing of š as \v{s}, writing out in full in the source allows for a more readable source document, and allows you to reuse parts outside of LaTeX.
This is particularly useful in linguistics so you can use your examples in other formates, e.g. in a word document, emails or in web pages/html slide shows.
Character Table is a fantastic package that allows you to insert unicode symbols based on their code, or search for them by their name.
So whilst you can always add the code using ctrl-shift-u on linux (or other way for windows/Mac), Character Table will allow you to search if you know the name, and not the code.
Simply type alt-l to bring up the dialogue and search!
 .
.
Zen
Zen is a nice package that makes your text window, and only the text window full screen. That is, it removes everything but what you are writing, so as to minimise distractions. This is nice for when you really need to just write, and not have a bunch of other things starting at you.
Sync-settings
If you use more than one computer sync-settings is really useful to make sure that the settings are the same on both.
All you need is a github account and you can use a gist to keep the settings there.
All your packages, themes and keystrokes can then be synced between the two computers using the backup and restore commands in the command pallette.
Git plus
Git plus is good if you want to add git integration to your editor, rather than running it through a separate program or the terminal.
Defining Snippets
latextools comes with some snippets predefined, for building the document and adding in some maths symbols and so on.
However, you can also define your own.
Go to edit -> snippets and you open the file snippets.cson with all your snippets.
The snippets are written in coffeescript and take the form:
'.source.js':
  'Snippet Name':
    'prefix': 'Snippet Trigger'
    'body': 'Hello World!'
This is the boilerplate of the snippet, which you can find if you type snip and then press tab in the snippets.cson file.
There are four parts to a snippet.
In the above, the first line is the scope of the snippet, which is the language that it applies to.
For LaTeX snippets, the scope should be .text.tex.
The second line is a descriptive name for the snippet.
This can be whatever you want.
The prefix (third line) is the sequence of characters that you type, followed by tab to expand the snippet.
The fourth line, the body, is what the snippet will expand to.
Within the snippet you can use $1 … $2 as placeholders for cursors, that you can cycle through after expanding the snippet.
$1 is the position where the cursor will first appear.
Hitting tab will move to position $2 and pressing tab again will cycle to position $3 and so on.
For instance, to add in the surrounding code for a gb4e example, define the following snippet:
'.text.tex':
  'ex':
    'prefix': 'exe'
    'body': '\\\\begin{exe}
        \\\\ex $1
      \\\\end{exe}'

  'tree':
    'prefix': 'tree'
    'body': """
          \\\\begin{tikzpicture}[baseline]
            \\\\Tree [.$1 $2 $3 ]
          \\\\end{tikzpicture}
    """
Then in the document, type exe followed by the tab key in the document, and the code will expand to the following, with the cursor placed one space after \ex:
\begin{exe}
    \ex
\end{exe}
The tree can also be expanded like follows:
 Saves you typing a lot of repetitive things, and avoids many cases of missing brackets.
Note: LaTeX markup uses a lot of \.
\, as in many programming languages, is used as a special symbol in coffeescript, and so writing \ will not insert \.
You actually need to write a sequence of four backslashes to get a single one, rather than the two you might expect.
There’s probably a good reason why this is the case, but I don’t know it.
Multi-line snippets can be written over multiple lines as above, in which case enclose the entire snippet in a sequence of three double quote marks, """ … """
Tab spaces in the snippet are then retained.
Also, snippets can be written all on one line between single quotes: '...'.
If you do, and you want a line break in the output use \n, and \t will give a tab space.
So, the above exe snippet is equivalent to the following on one line:
'.text.tex':
  'gb4e example boilerplate':
    'prefix': 'exe'
    'body': '\\\\begin{exe}\n\t\\\\ex $1\n\\\\end{exe}'
Customising
One of the great things about Atom is that it is very easy to change as and when you need it to.
The UI theme and editor theme can both be easily changed in the settings -> theme menu.
It comes preloaded with light and dark themes.
But, if you want something else, there’s many, many more that can be installed like the packages above.
Just search for them in settings -> install, find one you like, then click install and it will do it for you.
If you want examples, there are various lists online to give you an idea of where to start.
Bear in mind
Overall Atom is a fantastic text editor for writing LaTeX in. It’s particularly well suited for those that want an all-in-one editor where you can write the document and compile it from within the same programme. That’s not necessarily what everyone is looking for, and you don’t need to use it like that. Most of the time I prefer just using Atom for the writing, and handle comiling and viewing externally, but the features such as user snippets and bibliography integration are really useful to write with, meaning that even if you don’t want to make use of the all-in-one experience that Atom can offer through the latextools package, then it still nice to use the program.
Whilst Atom overall gives a really nice experience for writing LaTeX, it is not perfect. Firstly, it is a relatively heavy program to run, in terms of memory consumption. It is built on Electron, a framework that allows desktop apps to be built using web technologies. Whilst this allows for easy customisation, and has allowed a large community to build a lot of packages, it runs on the Chromium browser, which uses a significant amount of memory on your computer. This is not such a problem if you have a new, decently powerful computer, but if you are running it on an old or low powered computer, it will slow your system down. Atom has also been known to have problems when dealing with large files but it hasn’t affected me all that much in my usage, just once or twice.
Atom can also be overzealous in some of its default settings, favouring writing code over prose. It is aimed at developers after all. Some of the settings you may want to change:
- Disable the wrap-guide to remove the vertical line running down the editor window two-thirds of the way across the screen.
- The autocomplete-plus package can be useful for suggesting commands and snippets to autocomplete quickly, but it is distracting when writing prose, so consider either disabling the package altogether, or at least uncheck the
show suggestions on keystrokeoption in the settings menu. - A lot of programming software languages are enabled by default, such as langugage-csharp, language-php etc. If you are not planning to use them, you should disable them.
Finally, in recent years, Atom has been losing a lot of ground in user base to Microsoft’s Visual Studio Code (VS Code). I personally prefer Atom for writing LaTeX between the two, but in other cases it’s clear that VS Code provides a better experience. Microsoft owns Github, the developers of Atom, but have stated that they will keep developing both. However, the fact that VS Code is more widely used means that some packages available for Atom are no longer under development and you’ll get package deprecation warnings from time to time. This is not a problem for the ones I’ve mentioned here, but does come up from time to time in, for instance, themes. It’s not a reason not to use Atom, but something to be aware of.
-
If you prefer to use the command line, Atom will also install a command line utility called apm which you can use to install packages, rather than through the GUI. ↩